
Some mornings, you want your hair off your face before you leave the house. Other days, you have time to define your curls, arrange the front, or give the ends a little shape. Having a few reliable hairstyles makes both kinds of morning easier.
- Hairstyles for Women Over 40 at a Glance
- 1. Side-Parted Hair
- 2. Low Ponytail With a Smooth Front
- 3. Loose Low Bun
- 4. Half-Up Twist
- 5. Air-Dried Waves
- 6. Defined Curls or Coils
- 7. Bob With a Gentle Bend
- 8. Claw-Clip Twist
- 9. Side Braid
- 10. Brushed-Back Pixie
- 11. Headband With Loose Lengths
- 12. One-Sided Tuck With a Hidden Pin
- Choose a Style for Your Day
- Make the Style Fit Your Hair
- Keep Everyday Hairstyles Gentle on Your Hair
- Common Everyday Hairstyling Mistakes
- Adding More Product Before Adjusting the Shape
- Choosing Accessories Only by Appearance
- Pulling Everything Tighter to Make It Neater
- Expecting Every Strand to Match
- Choosing a Style You’ll Keep Rearranging
- Final Takeaway
- Frequently Asked Questions
Your haircut provides the starting point. A low ponytail may work with shoulder-length hair, while a half-up twist keeps shorter front layers away from your eyes. Straight hair, waves, curls, and coils each give the same arrangement a different finish.
These hairstyles for women over 40 offer options without requiring a new cut. No hairstyle guarantees confidence or a particular appearance. Choose arrangements that feel comfortable and are easy to repeat.
Hairstyles for Women Over 40 at a Glance
| Hairstyle | Main feature | Length to work with | What to consider |
|---|---|---|---|
| Side-Parted Hair | A different front outline | Short to long | Your natural parting |
| Low Ponytail With a Smooth Front | Lengths gathered near the nape | Medium to long | Whether shorter pieces reach the tie |
| Loose Low Bun | Ends tucked away | Medium to long | Comfortable fastening |
| Half-Up Twist | Two front sections joined at the back | Bob length and longer | How much hair to gather |
| Air-Dried Waves | Natural bends through the lengths | Any length with waves | Product amount and drying |
| Defined Curls or Coils | Shaped, separated sections | Any length | Definition versus fullness |
| Bob With a Gentle Bend | A shaped perimeter | Chin to collarbone | Where the ends naturally turn |
| Claw-Clip Twist | Hair secured off the neck | Medium to long | Clip size and grip |
| Side Braid | Lengths arranged over one shoulder | Past the shoulders | Layers that may fall free |
| Brushed-Back Pixie | Direction through the top | Cropped | Hair growth patterns |
| Headband With Loose Lengths | Front hair swept back | Any length | A comfortable band |
| One-Sided Tuck With a Hidden Pin | An open outline on one side | Bob length and longer | Discreet pin placement |
The lengths are guides. Layers, density, and accessory size can affect which styles are easiest to arrange.
1. Side-Parted Hair
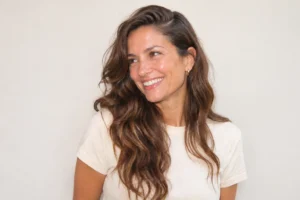
A change in parting alters the front of your hairstyle while leaving the lengths as they are.
Begin near your natural part and move it slightly to one side. Arrange the front with your fingers, allowing the hair to fall without pulling it firmly across the scalp.
If the section springs back, lightly dampen it and guide it into position with your fingers. For straight hair, let very wet hair dry a little before gently combing it.
Keep the change small at first. A slight shift may give you the front shape you want without needing a deep side part.
Best for: Refreshing loose hair with minimal styling.
2. Low Ponytail With a Smooth Front
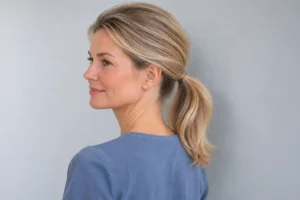
This ponytail keeps the front neat while leaving the tail in its natural texture.
Choose your parting, gather the hair near the nape, and secure it with a covered elastic made for hair. Smooth the surface lightly without pulling the hairline tight.
If the crown looks flatter than you prefer, gently lift a little hair there with your fingertips after securing the ponytail.
Leave shorter pieces free or pin them individually. Adjusting one section is often easier than tightening the entire style.
Best for: A tidy everyday arrangement for medium or long hair.
3. Loose Low Bun
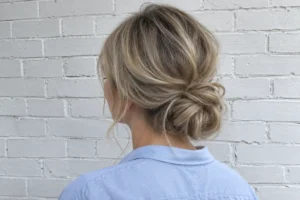
A low bun tucks away the lengths and gives you a compact shape at the nape.
Gather the hair into a loose ponytail. Twist the tail gently, wrap it around the base, and secure the bun with pins or a covered elastic.
Stop wrapping when the hair begins pulling at the roots. A softer coil can work just as well as a tightly wound bun.
Reposition any pin that presses against the scalp, especially before you leave for a long day.
Best for: Keeping the ends contained for work or everyday plans.
4. Half-Up Twist
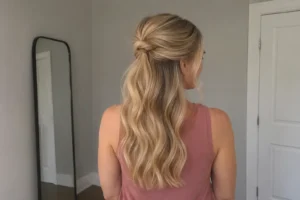
A half-up twist creates a small detail at the back while leaving most of the hair down.
Take a section from each side near the temples. Twist each section lightly toward the back, then join them with a clip or two pins.
Gather less hair if the loose lengths begin to look sparse. On denser hair, slightly larger sections may give you the balance you prefer.
Place the fastening just below the crown for a visible half-up shape, or lower for a quieter detail.
Best for: Securing front layers while keeping length and movement.
5. Air-Dried Waves
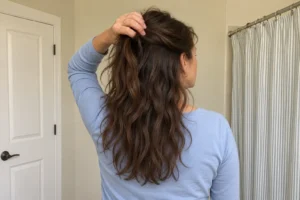
If your hair naturally forms waves, a little preparation can help you wear that pattern without reshaping every section.
After detangling, smooth a small amount of a suitable styling product through the damp lengths according to its directions. Gently scrunch the ends upward, then let the hair dry with as little handling as practical.
Once dry, separate only the pieces that need arranging. Leave the rest of the pattern intact if you like how it has formed.
For heated touch-ups, the American Academy of Dermatology recommends limiting heat, using a low or medium setting, and applying a heat protectant.
Best for: Wearing natural waves with light styling.
6. Defined Curls or Coils
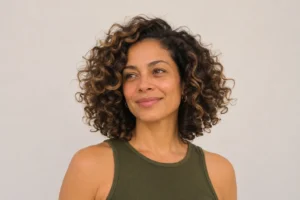
This look focuses on the curl pattern and the outline around the face.
The AAD recommends gently detangling textured or tightly curled hair while damp. Use a wide-tooth comb, beginning at the ends and gradually working upward.
Apply your usual curl product in sections, following its directions. Smooth it through, then arrange curls with your fingers or scrunch the lengths, depending on your pattern.
Allow the hair to dry before deciding whether to separate sections for more fullness. For coils, judge the final length and shape after shrinkage has settled.
Best for: Making curls or coils the main feature.
7. Bob With a Gentle Bend
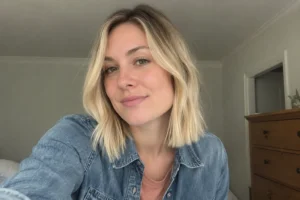
A bob can look finished with a small bend through the ends.
Arrange your parting, then guide the ends in the direction they naturally turn. If you use a dryer or heated tool, keep the heat on a low or medium setting and limit how long it stays on one section.
Work on the areas that need shaping rather than restyling every strand. An inward bend gives a different outline from ends that turn slightly outward near the shoulders.
Keep the finish smooth or leave some movement through it, depending on the texture you enjoy.
Best for: Showing the outline of a chin-to-collarbone cut.
8. Claw-Clip Twist
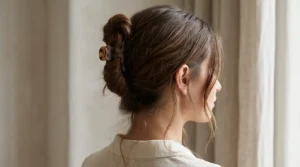
A claw clip can hold the hair off your neck without needing several pins.
Gather the lengths at the back and twist gently upward. Fold the ends down if needed, then secure the twist with the clip.
Choose a clip with enough space to close comfortably around your hair. If it slides, try a different size or a smaller section rather than forcing the hinge.
Position it where it won’t press against a headrest if you’ll be driving or traveling.
Best for: Securing medium or long hair quickly.
9. Side Braid

A side braid keeps longer hair together while leaving a softer outline around the head.
Bring the lengths over one shoulder and divide them into three sections. Cross the outer sections over the middle in turn, keeping the roots comfortable.
Secure the end with a covered elastic. Leave the braid compact or gently widen a few sections if you prefer a fuller appearance.
Short layers may fall free near the opposite ear. Pin them separately if they bother you.
Best for: Containing longer lengths without a bun.
10. Brushed-Back Pixie
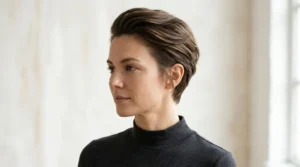
A pixie gives you room to change the direction of the longer top sections.
Begin with a small amount of styling product, spread across your fingers, and guide the front back or diagonally to one side.
Keep some separation through the top rather than pressing everything into one solid shape.
Work around the crown’s natural growth pattern. A section that lifts can become part of the style instead of something you keep flattening.
Best for: Adding shape and direction to short hair.
11. Headband With Loose Lengths
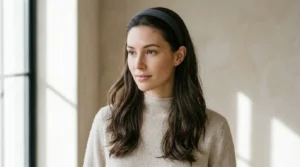
A headband sweeps the front back while leaving the rest of the hair in its usual texture.
Place the band behind the hairline and settle it into a comfortable position. Leave a few front pieces out if you prefer less of a swept-back look.
A narrow band provides a small detail. A wider fabric version becomes a more visible part of the outfit.
Choose a fit that stays in place without pressing behind the ears.
Best for: Changing the front with one accessory.
12. One-Sided Tuck With a Hidden Pin
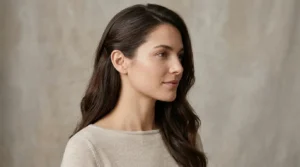
This style opens one side of the face while leaving the opposite side loose.
Choose your parting, tuck one side behind the ear, and place a small pin discreetly just behind it to keep the section in position.
Use only enough hair to create the outline you want. Gathering a large section changes the look into more of a pinned-back style.
Leave the opposite side in its natural shape so the difference between the two sides remains visible.
Best for: Adding a defined detail to loose hair.
Choose a Style for Your Day
Think about where you’ll spend the day before choosing the fastening.
A bulky claw clip may be inconvenient against a car headrest. A low bun might feel more comfortable for travel, while a braid can keep long hair together during active tasks.
Also consider how much attention the style will need. If you won’t have time to rearrange the front, secure it at the start instead of choosing a finish that needs repeated brushing.
Make the Style Fit Your Hair
Fine Hair
Use smaller sections for half-up styles so enough hair remains loose underneath.
Begin with light amounts of product. If an accessory slides, try a smaller one suited to the section you’re holding.
Dense Hair
Choose fastenings that accommodate the amount of hair without being forced shut.
For buns, distribute pins around the shape. Two smaller twists may be easier to secure than one large section.
Straight Hair
Straight hair may slip through smooth clips. Try a clip with a different grip or introduce a small twist before fastening a half-up style.
If you shape the ends with heat, use the precautions described in Look 5.
Wavy Hair
Leave room for the existing bends.
A half-up twist keeps most of the waves visible, while a low ponytail gathers them together without needing a smooth tail.
Curly and Coily Hair
Choose clips and bands with enough room for the shape you want to keep.
Gather sections gently and assess coily styles once dry, when shrinkage changes the visible length. Use Look 6 for damp detangling and definition.
Short Hair
Focus on the parting, top direction, and accessories.
A brushed-back front, headband, or small pinned section can give you variety without needing enough length to tie back.
Keep Everyday Hairstyles Gentle on Your Hair
The AAD identifies tightly pulled ponytails and buns as habits that can damage hair. It recommends looser arrangements and covered elastics made for styling hair. Continued damage can contribute to thinning or bald spots.
Keep the fastening secure without pulling firmly at the roots. Loosen a tie that feels uncomfortable and move any pin that presses against the scalp.
If you notice thinning or bald spots, see a dermatologist.
Common Everyday Hairstyling Mistakes
Adding More Product Before Adjusting the Shape
If the front keeps falling forward, try a different fastening or placement. More product may simply make the same arrangement heavier.
Choosing Accessories Only by Appearance
Size, grip, and comfort matter alongside color and design.
Pulling Everything Tighter to Make It Neater
Smooth or secure an individual section instead of tightening the whole style.
Expecting Every Strand to Match
A few different bends or shorter pieces don’t necessarily make the hairstyle unfinished.
Choosing a Style You’ll Keep Rearranging
If you constantly move or loosen it, try another arrangement that fits your day more comfortably.
Final Takeaway
The best hairstyles for women over 40 fit the way you live. A ponytail keeps the lengths contained, a half-up twist secures the front, and a change in parting refreshes loose hair.
Choose two or three arrangements you can repeat comfortably. You’ll have an option for rushed mornings and another for days when you want to spend more time on the finish.
Frequently Asked Questions
What are easy hairstyles for women over 40?
A side part, low ponytail, half-up twist, and pinned tuck are useful starting points. Choose according to your length and texture.
Do I need to cut my hair shorter after 40?
No. Choose a length you enjoy wearing and can comfortably manage.
Which hairstyle works for fine hair?
Try a small half-up twist, side-parted loose hair, or a low ponytail. Keep product amounts light and choose accessories that suit the section.
Can I wear these styles with gray hair?
Yes. The arrangements work whether your hair is gray, highlighted, or a solid color.
What can I do with shoulder-length hair?
A low ponytail, half-up twist, gentle bend at the ends, or pinned tuck may work. Shorter layers affect what reaches the fastening.
How can I style my hair without heat?
Try air-dried waves, defined curls or coils, a low bun, or a side braid. Arrange the style around your existing texture.
What should I ask my hairstylist?
Explain the hairstyles you want to wear. For example: “I usually leave my hair down, but I want the front long enough for a half-up twist and a comfortable low ponytail.”
Our Editorial Approach
Beauty and self-care information should be clear and easy to use. Our goal is to help you understand your options and make more informed choices about your everyday routine.
Our articles are for educational purposes only and do not replace advice from a qualified healthcare professional.